Gardening Effectively in Times of Drought
Extreme climate conditions have become the norm. They are no longer a thing of the past. As our planet continues to change and warm, we commonly see more droughts, flooding and extremes in temperature. Here in California, we are facing another summer of extreme drought. In order to continue following Amma’s instructions on growing food, the San Ramon Ashram vegetable gardens have implemented some age-old water conservation techniques.
Saving Water Is Easier Than You Think
Anyone can save water in their garden. These ancient methods have been proven to greatly reduce water consumption and still yield excellent harvests. Along with these practices, there are many other simple water-saving techniques every home gardener should implement in order to have a fruitful garden with low water consumption. One of the easiest things to do in the garden to save water is to water in the mornings or the evenings. This avoids the high noon sun which increases water evaporation. At the end of this article we list several water saving gardening practices.

Drip irrigation is thought to be the most water-efficient method of irrigating a garden, however much of this water is still lost in evaporation, particularly in hot, dry weather. Keeping in mind what Amma says that not a single drop should be wasted, the only way to irrigate effectively is to water deep underground. Bringing water directly to the roots ensures that no water is wasted by evaporating on the surface.
There are several buried irrigation techniques, but here at San Ramon Ashram we chose the Buried Clay Pot irrigation method. This irrigation method has been used effectively for over 4,000 years in India, China and Africa. The pots, also known as “ollas”, can be purchased ready-made such as these to the left. If you have budget to spare, they can also be custom made if one has access to a potter. Fortunately, there is also a simple do-it-yourself method that anyone can tackle and is easy on the budget.
We were fortunate here in San Ramon that a local devotee who is also a potter, donated many ollas for use around the ashram, and they are currently being used to successfully irrigate the Rose Garden as well as all the flower bushes at the Main Residence.
How To Make Ollas

For the Lotus Vegetable Garden, we made over 350 do-it-yourself ollas using simple unglazed terracotta flower pots, water-based, food grade silicone and a little duct tape. Here are some simple instructions for making ollas.
First, seal the bottom hole, with a small piece of duct tape on the outside of the pot. You just need enough tape to cover the hole. Then, fill the hole completely with silicone on the inside, thus plugging the hole.
Second, glue the two pots together with silicone. Once the silicone on the ollas is dry (this usually takes 24 hours), your ollas is finished.
Third, you can bury the ollas in your vegetable garden. Bury the ollas so that only an inch is left above the soil surface, and place a cap of some sort over the top hole. You can use ceramic tiles, stones or inverted flower pot saucers.

Once in the ground, if the tape deteriorates, that is OK as the silicone will hold in place keeping the hole plugged.
Ideally, one olla made of 2 8-inch pots will hold about a gallon of water, and this will irrigate a 4 square foot patch of garden. So, 1-gallon ollas can be placed 2 feet apart, while larger ones can be 3-4 feet apart.
You can hand-fill the ollas individually if you have a small garden, or you can incorporate them into your drip irrigation system by inserting the drip lines directly into each olla, as we did in San Ramon. Take note of the time it takes to fill the olla. Then set your irrigation timers accordingly.
Ollas Can Even Increase Plant Production

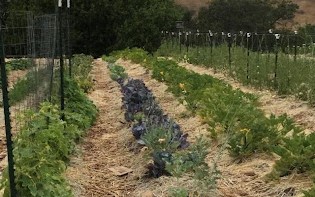
At the San Ramon Lotus Garden we implemented ollas in most of the rows, and were able collect some very strong comparative data as to the conservation of water and productivity of vegetable plants using this irrigation method versus drip irrigation. Two rows irrigated with ollas produced 400 lbs. of vegetables, while comparatively sized rows using drip irrigation yielded only 115 lbs.
Water consumption for the olla rows compared to the drip irrigated rows was roughly 70% less, and due to the fact that the irrigation is strictly underground. In addition, unwanted weeds in the olla rows were almost non-existent compared to the drip irrigated ones due to the lack of surface water.
In the San Ramon Rose Garden, we were fortunate to receive many hand-made ollas from a devotee who is a potter, so these have been buried beside the rose bushes, at least 2 pots per bush, and are providing effective irrigation and greatly reduced water consumption. The roses are thriving!
Due to our warm climate here in San Ramon, the ollas can remain in the ground even through the winter. However, if you live in a northern climate you will have to dig up your ollas, allow them to dry and store them during the freezing months to reuse the next year.
Simple Water-Saving Techniques

If you cannot implement a buried clay pot method, then the following tips will be helpful in reducing your garden’s water consumption, no matter where you live.
- Mulch, mulch, mulch! Adding an organic covering to your gardens helps prevent water evaporation. This can be wood chips, straw, or dried leaves. Make sure the mulch is at least a couple of inches deep to provide the appropriate protection to your soil. Here in San Ramon we mulch with wheat straw and also hardwood mulch.
- Water at ground level, not sprinkling. Sprinklers typically waste a lot of water as they are subject to evaporation more quickly that allowing the water to immediately seep into the soil.
- Measure how much water you need. Buy a soil moisture reader to determine how often you need to irrigate your gardens. By testing the moisture content of your soil at the root level, you might be able to stretch out your waterings.
- Water only mornings or evenings, when the day is cooler and the sun is not at its full strength. This will give the water a chance to percolate down into the soil before evaporation begins.
- Use shade cloth if you have very strong, hot sun in your gardens all day. We implemented this in some of our raised beds here in San Ramon and were able to grow cool season crops such as lettuces well into the summer!
- Put a water timer on your hose to better understand how much water you are using, and continue to tweak and modify your consumption.
- Replace high consumption plants and grass with drought tolerant and native varieties if possible. These will have a greater chance of thriving in your garden under water restrictions.

These methods are mostly for more shallow rooted plants and bushes, so for the three fruit tree orchards here in San Ramon Ashram, we are implementing a different system altogether. Look to a follow-up blog post on the details of this method that is specifically for fruit trees and other deep-rooted plants!
For more information about gardening in general, check out the courses at www.amritavirtualacademy.com/gardening Learn how to help your garden thrive.